VCV Manual
Rack
Plugin Development
- Tutorial
- API Guide
- Panels
- Manifest
- Presets
- Voltage Standards
- Digital Signal Processing
- Migrating v1 Plugins to v2
- Licensing
Rack Development
Appendix
Plugin API Guide
Rack’s plugin API offers many optional features to improve the usability and performance of your modules. This guide summarizes these features along with examples and tips.
For the full API reference, see the Rack headers on GitHub or the auto-generated Doxygen docs.
- Module configuration
- Module events
- Data serialization
- Context menu
- Expanders
- Dark panels
- Custom widgets
- Polyphony
- SIMD library
- DSP library
Module configuration 
After configuring your Module subclass with config(numParams, numInputs, numOutputs, numLights), you can configure the labels and behavior of each component in your Module's constructor.
Inputs, outputs, and lights 
Add labels to tooltips of inputs, outputs, and lights with configInput(), configOutput(), and configLight().
For example:
configInput(PITCH_INPUT, "Pitch (1V/octave)");
configOutput(SINE_OUTPUT, "Sine");
configLight(PHASE_LIGHT, "Phase");
Tooltips append the words “input”, “output”, and “light”, so don’t include them in your label strings.
Light tooltips are often unnecessary, so we recommend only including them if the meaning of a light isn’t obvious.
Parameters 
The configParam() method sets a parameter’s range, default value, label, unit, and display scale.
Here are several examples.
// Knob with minimum (hard-left) value 0, maximum (hard-right) value 1, and default (initial) value 0.5.
configParam(SIMPLE_PARAM, 0.f, 1.f, 0.5f, "Simple");

// Unit label to display strings like "10 V" or "0 V" in the tooltip.
// We recommend prefixing a space to separate the number from the unit.
configParam(OFFSET_PARAM, -10.f, 10.f, 0.f, "Offset", " V");

// Multiply display value by 100 and append a percent sign.
configParam(PERCENT_PARAM, -1.f, 1.f, 0.f, "Percent", "%", 0.f, 100.f);

// Display "261.62 Hz" at value 0, equal to middle C.
// Use exponential base 2 for 1V/octave.
configParam(PITCH_PARAM, -5.f, 5.f, 0.f, "Pitch (1V/octave)", " Hz", 2, dsp::FREQ_C4);

// Display "-inf dB" at value 0 to "6.02 dB" at value 2 with default "0 dB" at value 1.
// Use logarithmic base 10 (encoded by -10) with 20 dB multiplier.
configParam(GAIN_PARAM, 0.f, 2.f, 1.f, "Gain", " dB", -10, 20);
The configSwitch() method is useful for multi-mode switches displaying a label for each value.
Users can select each choice directly by right-clicking on the switch.
// Switch with 3 modes (values 0 to 2), defaulting to "Hi-fi".
configSwitch(QUALITY_PARAM, 0.f, 2.f, 0.f, "Quality", {"Hi-fi", "Mid-fi", "Lo-fi"});
The configButton() is similar to configSwitch() but with no labels and range 0 to 1 with default 0.
This is useful for momentary switches.
configButton(GATE_PARAM, "Gate");
You can optionally add a one-line description to any component if extra information needs to be conveyed in the tooltip.
getParamQuantity(SEND_PARAM)->description = "Pre-fader";
getOutputInfo(PINK_NOISE_OUTPUT)->description = "-3 dB/octave power density";
Bypass 
Users can bypass a module using its context menu or a key command, which disables the module’s DSP processing and optionally routes certain inputs directly to certain outputs, as if jumper cables are connected between them.
You (the module developer) can configure these bypass routes with configBypass().
Ports should only be bypass-routed if your module applies an effect to an input signal and passes it to an output. For example:
- audio input → lowpass filter output
- CV input → inverted CV output
- gate input → delayed gate output
These routes would NOT be appropriate when bypassed:
- pitch CV input → sine audio output. The signal types are unrelated, and the user does not want to listen to a pitch CV signal.
- channel 1 input → mixer output. A mixer is not an effect, and the user likely wants to mute the mixer output rather than unity-mix all channels.
- clock input → sequencer trigger output. The user likely wants to mute all trigger outputs, not generate a trigger every clock step.
Beyond these examples, bypass routes can be subjective, so consider users’ most expected, least surprising behavior when bypassing.
The following example routes both stereo inputs to their respective stereo outputs when the module is bypassed.
configBypass(LEFT_INPUT, LEFT_OUTPUT);
configBypass(RIGHT_INPUT, RIGHT_OUTPUT);
More complex bypass routing can be achieved by overriding processBypass(), which is identical to process() but is called instead when the module is bypassed.
To extend the above example, you may want to implement left-to-right normaling, which can’t be achieved with configBypass().
struct MyModule : Module {
	...

	void processBypass(const ProcessArgs& args) override {
		// Note: Does not support polyphony
		float left = getInput(LEFT_INPUT).getVoltage();
		// Route left input to right output if right input is disconnected
		float right = getInput(RIGHT_INPUT).isConnected() ? getInput(RIGHT_INPUT).getVoltage() : left;
		getOutput(LEFT_OUTPUT).setVoltage(left);
		getOutput(RIGHT_OUTPUT).setVoltage(right);
	}
};
Module events 
Sometimes you need to handle certain events that occur with your module, such as the user resetting or randomizing it, or the engine sample rate changing.
Override the appropriate Module::on*() method and remember to call the superclass’s method unless you want to replace its default behavior.
For example:
struct MyModule : Module {
	...

	void onReset(const ResetEvent& e) override {
		// Reset all parameters
		Module::onReset(e);
		// Reset custom state variables
		...
	}

	void onRandomize(const ResetEvent& e) override {
		// Randomize all parameters
		Module::onRandomize(e);

		// Or, remove the above line and randomize parameters yourself.
		params[MY_PARAM].setValue(random::uniform());

		// Randomize custom state variables
		...
	}

	void onSampleRateChange(const SampleRateChangeEvent& e) override {
		Module::onSampleRateChange(e);
		// Change sample rate of custom state variables
		...
	}
};
Thread-safety note: Although Module methods such as events, process(), and dataToJson()/dataFromJson() may be called by different threads, they are mutually-exclusive, meaning that Rack never calls any Module methods simultaneously from multiple threads.
Data serialization 
When a user closes VCV Rack or saves a patch, the state of all modules is saved to a file.
Rack automatically saves the values of all parameters such as knobs, sliders, and switches, but if you store additional state data in Module instance variables, you must write custom code to save/load this data.
JSON 
Custom data can be stored and retrieved in a JSON object by overriding the dataToJson() and dataFromJson() methods in your Module subclass.
For example, if your module uses an int mode instance variable, the following code can save/load it.
struct MyModule : Module {
	...

	json_t* dataToJson() override {
		json_t* rootJ = json_object();
		json_object_set_new(rootJ, "mode", json_integer(mode));
		return rootJ;
	}

	void dataFromJson(json_t* rootJ) override {
		json_t* modeJ = json_object_get(rootJ, "mode");
		if (modeJ)
			mode = json_integer_value(modeJ);
	}
};
JSON can store/retrieve several C++ data types using the Jansson library:
bool:json_boolean()/json_boolean_value()const char*:json_string()/json_string_value()int64_t:json_integer()/json_integer_value()double:json_real()/json_number_value()Note:json_real_value()is not recommended because it fails to parse integer values.- Array:
json_array()andjson_array_set_new()/json_array_foreach() - Object with string keys:
json_object()andjson_object_set_new()/json_object_foreach()
Patch storage 
If your module needs to save/load a large amount of data (>100 kB or so), JSON serialization might lag the main thread when autosaving (every 15 seconds by default).
To solve this problem, module instances can request to have their own per-patch storage directory where they can create arbitrarily large files (even gigabytes of recordings) and read/write them at any time.
When the user saves their patch, VCV Rack compresses all module patch storage into a single .vcv file.
Modules can create their patch storage directory with the createPatchStorageDirectory() method and use the return value to build a file path.
It is usually only necessary to save/load files when the patch is saved or when the module is added to the rack.
For example:
struct MyModule : Module {
	...

	void onAdd(const AddEvent& e) override {
		std::string path = system::join(getPatchStorageDirectory(), "recording.wav");
		// Load from file. File might not exist if module was just created.
		...
	}

	void onSave(const SaveEvent& e) override {
		std::string path = system::join(createPatchStorageDirectory(), "recording.wav");
		// Save to file.
		...
	}
};
It is possible to access patch files in Module::process(), but doing so can block the DSP thread, resulting in audio hiccups.
Instead, we recommend accessing them only in Module event methods or your own worker thread.
Plugin settings 
If your plugin needs to save/load plugin-scope data such as settings, you can implement settingsToJson() and settingsFromJson() in your plugin.cpp file.
This JSON object is stored inside <Rack user folder>/settings.json and auto-saved on quit and periodically (every 15 seconds by default).
For example, to save an int theme global variable, add this code to the root scope of your plugin.cpp.
json_t* settingsToJson() {
	json_t* rootJ = json_object();
	json_object_set_new(rootJ, "theme", json_integer(theme));
	return rootJ;
}

void settingsFromJson(json_t* rootJ) {
	json_t* themeJ = json_object_get(rootJ, "theme");
	if (themeJ)
		theme = json_integer_value(themeJ);
}
Context menu 
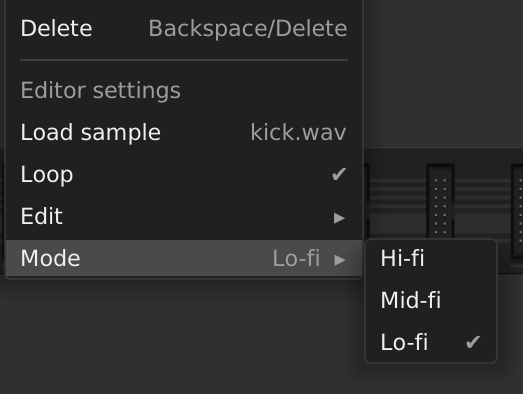
When a user right-clicks on your module’s panel, a context menu appears with familiar actions like “Initialize”, “Randomize”, or “Delete”. You can add your own custom menu items at the end to offer settings that are not available on your panel.
To append items to your module’s context menu, override ModuleWidget::appendContextMenu().
Create specific menu items with the create*() helper functions, and add them to the menu with menu->addChild().
The following code sample demonstrates most types of menu items that can be appended to a module’s context menu.
To run custom code when a menu item is clicked or expanded, use lambdas that capture variables by copy: [=]() {...}.
struct MyModuleWidget : ModuleWidget {
	...

	void appendContextMenu(Menu* menu) override {
		MyModule* module = getModule<MyModule>();

		menu->addChild(new MenuSeparator);

		menu->addChild(createMenuLabel("Editor settings"));

		menu->addChild(createMenuItem("Load sample", "kick.wav",
			[=]() {
				module->loadSample();
			}
		));

		// Controls bool Module::loop
		menu->addChild(createBoolPtrMenuItem("Loop", "", &module->loop));

		menu->addChild(createSubmenuItem("Edit", "",
			[=](Menu* menu) {
				menu->addChild(createMenuItem("Copy", "", [=]() {copy();}));
				menu->addChild(createMenuItem("Paste", "", [=]() {paste();}));
			}
		));

		// Controls int Module::mode
		menu->addChild(createIndexPtrSubmenuItem("Mode",
			{"Hi-fi", "Mid-fi", "Lo-fi"},
			&module->mode
		));
	}
};
We recommend adding a MenuSeparator first to visually separate your custom menu items from the common menu items.
Expanders 
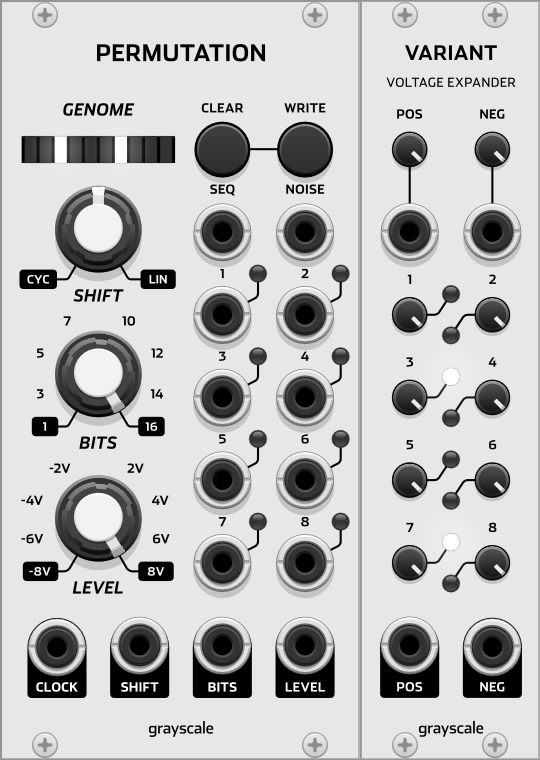
Some Eurorack hardware modules can communicate with adjacent modules using bus cables behind their panels. This can be used to expand a module’s functionality with extra ports and parameters.
Similarly in VCV Rack, a module can communicate directly with other modules touching its left or right side. For example, Grayscale Permutation can send its gate information to Grayscale Variant to generate a CV signal (pictured).
To access an adjacent module from your main Module, you must check its existence and model.
Once confirmed, you can implement its entire DSP algorithm in the main module.
In this example, we access a MyExpander module when it is touching the main module’s right-hand side.
Module* rightModule = getRightExpander().module;
if (rightModule && rightModule->model == modelMyExpander) {
	// We are now certain that rightModule is a MyExpander.
	// We can process its params, ports, and lights.
	float in = rightModule->getInput(MyExpander::AUDIO_INPUT).getVoltage();
	float gain = rightModule->getParam(MyExpander::GAIN_PARAM).getValue();
	rightModule->getOutput(MyExpander::AUDIO_OUTPUT).setVoltage(in * gain);
}
The expander module can override onExpanderChange() to clear its outputs and lights when disconnected.
Messages 
You might instead prefer for MyExpander to have its own separate process() method.
However, if either module attempts to directly access instance variables of the other module, its process() call might happen before, after, or during (if multi-threading is enabled) the other module’s process() call.
This can result in inconsistent latency (0 or 1 engine frames) or corrupt reads.
The solution is to use expander “messages”, which are double-buffers of binary data. This ensures that data is always shared with 1 engine frame of latency.
To send data (such as a float or struct) from the primary module to its expander, add two copies to the expander and assign their addresses as the expander message buffer.
struct MyExpander : Module {
	...
	float value[2] = {};

	MyExpander() {
		...
		getLeftExpander().producerMessage = &value[0];
		getLeftExpander().consumerMessage = &value[1];
	}
};
Then in the primary module, send a producer message when necessary.
Module* rightModule = getRightExpander().module;
if (rightModule && rightModule->model == modelMyExpander) {
	// Get the producer message and cast to the correct pointer type.
	float* value = (float*) rightModule->getLeftExpander().producerMessage;

	// Write to the buffer
	*value = 42.f;

	// Request Rack's engine to flip the double-buffer upon the next engine frame.
	rightModule->getLeftExpander().requestMessageFlip();
}
Upon Rack’s next engine frame, MyExpander's producer and consumer message pointers will be swapped, so the formerly produced value is ready for consumption by the expander’s process() method.
float* value = (float*) getLeftExpander().consumerMessage;
You can now read the buffer to process MyExpander's outputs or lights.
Dark panels 
Since Rack 2.4, users can request modules to use dark-themed panels by enabling “View > Use dark panels if available”.
To offer a dark panel theme, add a second argument to createPanel() with the path to a dark SVG file.
setPanel(createPanel(
	asset::plugin(pluginInstance, "res/VCO.svg"),
	asset::plugin(pluginInstance, "res/VCO-dark.svg")
));
You can optionally replace ScrewSilver with ThemedScrew and PJ301MPort with ThemedPJ301MPort to better match the panel.
For custom dark widgets, you can subclass ThemedSvgScrew or ThemedSvgPort.
Or you can read the value of bool settings::preferDarkPanel in your custom code.
If your panels are already dark-themed, you can ignore this feature or create light-themed panels as the default.
Custom widgets 
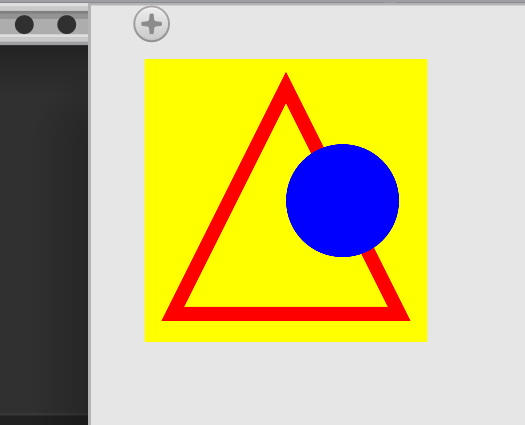
Some modules include displays with waveforms, visualizations, or other dynamic elements.
You can create these displays by subclassing Widget and overriding its draw() method.
Shapes, lines, colors, and text can be drawn using the NanoVG API.
The following code sample demonstrates drawing to the NanoVG context accessed by the args.vg variable.
struct MyWidget : Widget {
	void draw(const DrawArgs& args) override {
		// Draw a yellow rectangle with the size of this widget
		nvgFillColor(args.vg, nvgRGBf(1.0, 1.0, 0.0));
		nvgBeginPath(args.vg);
		nvgRect(args.vg, 0.0, 0.0, box.size.x, box.size.y);
		nvgFill(args.vg);

		// Draw a triangle with blue stroke
		nvgStrokeColor(args.vg, nvgRGBf(1.0, 0.0, 0.0));
		nvgStrokeWidth(args.vg, 5.0);
		nvgLineJoin(args.vg, NVG_MITER);
		nvgBeginPath(args.vg);
		nvgMoveTo(args.vg, 10.0, 90.0);
		nvgLineTo(args.vg, 90.0, 90.0);
		nvgLineTo(args.vg, 50.0, 10.0);
		nvgClosePath(args.vg);
		nvgStroke(args.vg);

		// Draw a blue circle
		nvgFillColor(args.vg, nvgRGBf(0.0, 0.0, 1.0));
		nvgBeginPath(args.vg);
		nvgCircle(args.vg, 70.0, 50.0, 20.0);
		nvgFill(args.vg);
	}
};
Add the widget to your ModuleWidget constructor.
MyWidget* myWidget = createWidget<MyWidget>(Vec(20, 20));
myWidget->setSize(Vec(100, 100));
addChild(myWidget);
VCV modules like VCV Scope and VCV ADSR EG use a subclass of LedDisplay instead of Widget for a more attractive and consistent starting point for their LED screen-like displays.
Text 
Static text can be written directly on SVG module panels, but sometimes it is necessary to display dynamic text on a custom widget. For example, a signal measurement module can display the voltage value which is updated every second.
VCV Rack includes several fonts whose paths can be obtained with asset::system("res/fonts/...").
Or, you can include and use your own TTF font with asset::plugin(pluginInstance, "res/...").
To render text in a Widget's draw() method, load the font from Rack’s cache each frame and use NanoVG to set the position, size, alignment, etc and draw the text.
void draw(const DrawArgs& args) override {
	// Load font from cache
	std::string fontPath = asset::plugin(pluginInstance, "res/MyFont.ttf");
	std::shared_ptr<Font> font = APP->window->loadFont(fontPath);
	// Don't draw text if font failed to load
	if (font) {
		// Select font handle
		nvgFontFaceId(args.vg, font->handle);
		// Set font size and alignment
		nvgFontSize(args.vg, 16.0);
		nvgTextAlign(args.vg, NVG_ALIGN_LEFT | NVG_ALIGN_BASELINE);

		// Generate your text
		float voltage = 42.f;
		std::string text = string::f("%6.2f V", voltage);
		// Draw the text at a position
		nvgText(args.vg, 100.0, 100.0, text.c_str(), NULL);
	}
}
Avoid storing Font instances in your Widget across multiple frames since they are tied to Rack’s Window object, which can be destroyed and re-created.
Self-illuminating layer 
Rack’s “room” brightness can be turned down in the “View” menu, revealing only self-illuminating objects such as lights.
These objects are drawn on layer 1 by overriding the drawLayer() method.
void drawLayer(const DrawArgs& args, int layer) override {
	if (layer == 1) {
		// Call NanoVG functions here to draw objects on the self-illuminating layer.
		...
	}
	// Remember to call the superclass's method.
	Widget::drawLayer(args, layer);
}
Framebuffer 
VCV Rack calls the Widget::draw() method every screen frame, so complex widgets with lots of paths and text can consume a lot of CPU/GPU.
If your custom widget doesn’t need to be redrawn every frame, you can cache its raster result with a GPU framebuffer.
To do this, place your widget inside a FramebufferWidget.
FramebufferWidget* myWidgetFb = new FramebufferWidget;
addChild(myWidgetFb);

MyWidget* myWidget = createWidget<MyWidget>(Vec(20, 20));
myWidget->setSize(Vec(100, 100));
myWidgetFb->addChild(myWidget);
Then mark the framebuffer as “dirty” when you need to redraw the child widget.
myWidgetFb->setDirty();
(Alternatively, dispatch a DirtyEvent.)
A common pattern is for a custom widget to create its own child FramebufferWidget, which contains other custom widget(s).
The top-level widget manages the framebuffer, marking it as dirty when its child widgets need to be redrawn.
Polyphony 
Cables in VCV Rack can be polyphonic, carrying up to 16 voltage signals.
To support polyphony, your module’s process() code must read each channel from input ports and write each channel to output ports.
See the VCV standard for polyphony to learn the correct behavior for handling polyphonic cables.
To add polyphony to the tutorial’s “sine oscillator” example, turn all DSP state variables into 16-element arrays.
// Initialize all phases to 0.
float phase[16] = {};
Then rewrite the process() method to loop through each channel.
void process(const ProcessArgs &args) override {
	// Get desired number of channels from a "primary" input.
	// If this input is unpatched, getChannels() returns 0, but we should still generate 1 channel of output.
	int channels = std::max(1, inputs[PITCH_INPUT].getChannels());

	// Iterate through each active channel.
	for (int c = 0; c < channels; c++) {
		float pitch = params[PITCH_PARAM].getValue();
		// Use getPolyVoltage(c) so that monophonic inputs apply their modulation to all channels.
		pitch += inputs[PITCH_INPUT].getPolyVoltage(c);
		float freq = dsp::FREQ_C4 * std::pow(2.f, pitch);

		phase[c] += freq * args.sampleTime;
		if (phase[c] >= 1.f)
			phase[c] -= 1.f;

		float sine = std::sin(2.f * M_PI * phase);
		// Set the c'th channel by passing the second argument.
		outputs[SINE_OUTPUT].setVoltage(5.f * sine, c);
	}

	// Set the number of channels for each output.
	outputs[SINE_OUTPUT].setChannels(channels);
}
Tip: If your module uses several instance variables, you can organize each channel’s state into an array of structs.
struct OscillatorEngine {
	float phase = 0.f;
};
OscillatorEngine engines[16];
Then you can access each engine inside the for-loop with:
OscillatorEngine& engine = engines[c];
engine.phase = ...
SIMD library 
Modern CPUs have the ability to operate on multiple values with a single instruction, using SIMD (single instruction, multiple data) instruction sets. For example, instead of performing
a[0] += 1;
a[1] += 1;
a[2] += 1;
a[3] += 1;
with 4 sequential instructions, you can use a single 4-element SIMD instruction to perform all operations in parallel, so you can expect roughly a 4x performance improvement in CPU-bottlenecked algorithms. (Actual speedup is often less due to memory bottlenecks, instruction throughput bottlenecks, Amdahl’s law, etc.)
VCV Rack on x64 allows up to the SSE4.2 extension, capable of operating on 4-element vectors of 32-bit floats or integers.
Rack’s SIMD library includes data types simd::float_4 and simd::int32_4, which behave like 4-element arrays of float and int32_t values.
However, you can treat these arrays like single (scalar) values with operators + - * / += -= *= /= etc.
Several math functions like sin(), exp(), and floor() are also available for float_4.
It is possible to access SIMD array elements with index notation a[i], but doing this frequently defeats the benefit of SIMD.
Performance becomes as slow as serial non-SIMD code.
We can again rewrite the previous section’s “sine oscillator” example using SIMD types.
Instead of 16 float values, use 4 float_4 values.
using simd::float_4;
float_4 phase[4] = {};
Then rewrite the loop to process 4 channels at a time.
void process(const ProcessArgs &args) override {
	int channels = std::max(1, inputs[PITCH_INPUT].getChannels());

	// Iterate through each vector of 4 channels, instead of 1 at a time.
	for (int c = 0; c < channels; c += 4) {
		float_4 pitch = params[PITCH_PARAM].getValue();
		// Get vector of 4 voltages, starting at channel c.
		pitch += inputs[PITCH_INPUT].getPolyVoltageSimd<float_4>(c);
		// Use simd:: math functions instead of std::.
		float_t freq = dsp::FREQ_C4 * simd::pow(2.f, pitch);

		// Most arithmetic operators are overloaded for the float_4 type.
		// Here we are multiplying a float_4 by a float scalar.
		phase[c / 4] += freq * args.sampleTime;
		// We can't branch on SIMD elements or we lose their performance benefit.
		// Instead, find clever techniques to avoid branching while achieving the same result.
		phase[c / 4] -= simd::trunc(phase[c / 4]);

		float_4 sine = simd::sin(2.f * M_PI * phase);
		outputs[SINE_OUTPUT].setVoltageSimd(5.f * sine, c);
	}

	// Set the number of channels for each output.
	outputs[SINE_OUTPUT].setChannels(channels);
}
While SIMD parallelization across multiple polyphony channels is a common practice, you can also apply parallelization to computations within one channel. Convolution, filters, and stereo/quad processing can benefit from SIMD optimization.
DSP library 
Rack’s API includes several DSP headers such as:
- Common functions and constants
- Digital utilities like trigger detectors and pulse generators
- Fast approximations of common math functions
- FFT (Fast Fourier Transform)
- Sample rate converter
- ODE (Ordinary Differential Equation) solvers
- Common filter processors
To further optimize our “sine oscillator” example above, we can replace simd::pow(2.f, pitch) with dsp::exp2_taylor5(pitch), which approximates
VCV is always looking for more tools to add to its DSP library. If you have an request, let us know at VCV Support.